This recipe for Homemade Clotted Cream is the best way to use up any heavy cream for which you might not have plans for plus I share tips on how to freeze it for later to extend its shelf life.
In today's post, I'll walk you through:
- What type of cream gives us the best results for clotted cream
- A step-by-step process for making this luxurious cream
- Ways to store and freeze it for better results
- All the delicious ways to enjoy your fresh clotted cream
Let's get started!
A Brief Origin Story on Clotted Cream
Clotted cream comes from the southwestern area of England in the United Kingdom. It is a staple in British cuisine and is a notable specialty found in the regions of Cornwall and Devon. Depending on where you're enjoying it within the regions, it may also be referred to as "Devonshire cream," "Devon Cream," "Cornish clotted cream," or "Cornish cream."
Clotted cream is commonly enjoyed as a topping for scones served alongside jam. Because this is a rich and luxurious cream that is thick and silky in texture, it's best enjoyed during afternoon tea or served as an accompaniment to desserts and fruit.
What Type of Cream Is Used to Make Clotted Cream
The best cream to use for making clotted cream is a heavy whipping cream or double cream. I've found it's best to the use the best quality dairy products for making clotted cream. Because it's the only ingredient we're using to make the cream, you want to use a good quality and delicious cream that is not an ultra-pasteurized cream. Using ultra-pasteurized cream can affect the creamy texture of the clotted cream as this type of cream has been known to cause consistency problems in either making butter or whipping cream.
If we're going to take the time to make this, and it does take time, let's opt for a good quality cream with a high-fat content and low pasteurization. Kalona Supernatural and Clover Sonoma are two of my personal favorite brands to use. I find both of these brands at my local Sprouts Market.
Clotted cream is traditionally made by heating unpasteurized cow’s milk and allowing it to slowly cool, causing the cream to rise and form a thick layer on the surface. The thick cream is then skimmed off and collected, resulting in a velvety, clotted consistency.

A Step-by-Step Recipe for Homemade Clotted Cream
This clotted cream recipe requires a large amount of time. If this is your first time making it, prepare yourself for a near three day journey in making this delicious treat. But fear not. The fruits of our labor will be worth it for homemade scones and our favorite raspberry jam or strawberry jam. I've structured this step-by-step recipe in hours, but think about this in the course of 3 days.
The First 12 Hours: Bake the Cream Low and Slow
During the first 12 hours, we're going to bake the cream in our oven. To do this:
- Preheat your oven to 170-180F.
- Pour the heavy cream into a shallow casserole dish or baking dish. The heavy cream should come up along the sides about 2 inches. We want to ensure there is a lot of surface area during the slow bake.
- Bake the heavy cream in the oven for 12 hours, uncovered. You can start this process overnight and set your timer to check 12 hours from the start of the bake.

The Second 12 Hours: Cool the Cream and Set
Once the cream has baked for 12 hours:
- The cream will have developed a layer of skin indicating the fat has separated from the liquid. Use oven mitts to carefully remove the dish from the oven.
- Allow the baked cream to cool to room temperature. Once cooled, cover the dish and refrigerate overnight.
The Last 1 Hour: Mix clotted Cream and Store (AKA Day 3)
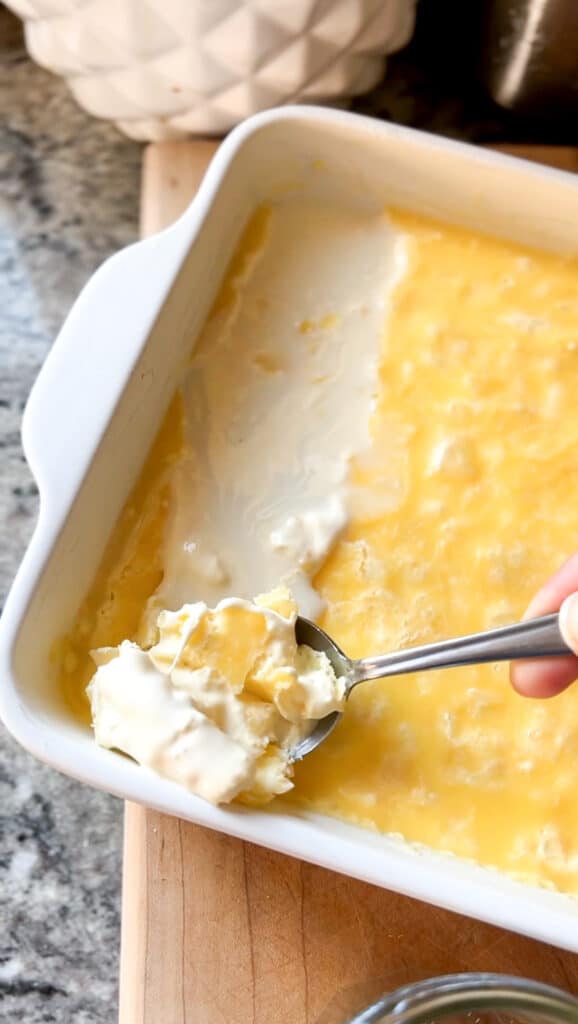
- Once chilled, remove the baking dish from the refrigerator and gently skim the thick layer of clotted cream from the surface. Place the skimmed cream into a medium mixing bowl. Leave the thinned liquid in the baking dish (you can save this for another use).
- Using a spoon, begin to stir the skimmed clotted cream, slowly at first, and then more vigorously to create a smooth and creamy texture. If the clotted cream is too thick for your preference, add in a tablespoon at a time of the thinned liquid back into the cream. Continue to stir until it reaches your desired consistency.
- Store the clotted cream in an airtight container in the refrigerator for up to a week. You can also freeze small portions of the clotted cream for up to two months. Thaw desired portions in the refrigerator overnight before using.

How to Store Clotted Cream Plus How to Freeze
Though clotted cream is a high-fat product with high fat content in the process of making it, it is a good idea to use your clotted cream within a week. The best option is to store your clotted cream in an airtight container with a tight-fitted lid. It will keep well in the fridge for up to a week though you'll want to use within the first 5 days for optimal taste and texture of the cream.
How will I know if my clotted cream has spoiled?
Like with any full-fat milk dairy products it’s important to know the signs of spoilage. When checking to see if your clotted cream is still good, consider the following:
- Scent: Smell your clotted cream. If it has a sour or nutty flavor, or it just smells "off", this could be a sign that the clotted cream has gone bad. Toss it immediately. For context: fresh clotted cream should have a very pleasant, slightly sweet and creamy aroma.
- Sight: Check the surface of the clotted cream for any mold or unusual growth. If you notice any fuzzy patches, green spots, or discoloration, the cream has spoiled and should not be consumed.
- Texture: Clotted cream should have a smooth and thick consistency. If you notice any watery separation, curdling, or a slimy texture of the cream, the cream has likely gone bad.
- Taste: If you’re still uncertain about the quality of your clotted cream, perform a small taste test. If the clotted cream has a tangy or sour taste, this likely indicates the beginning of bacterial growth and spoilage. Toss it. Clotted cream should have a silky texture and have the best flavor that is creamy and slightly sweet.
How to Freeze Clotted Cream
While clotted cream has a shorter shelf life compared to other dairy products, an excellent way to extend its shelf life is to freeze it. Doing so helps to prevent food waste if you cannot use up all the clotted cream at once. And since we've taken the great effort and care to make this cream that has a rich flavor, let's maximize it! Freezing our cream allows us to enjoy it at our leisure even when it's not in season or it's difficult to find at your local grocery store.
Whether we save it for special occasions or a proper afternoon tea, freezing the clotted cream is a good way to have small amounts on hand whenever we want or crave a bit of cream for a tasty baked treat. The freezing process for clotted cream is incredibly simple and helps us to preserve this luxurious dairy product for future use.
Freezing the Clotted Cream
Here’s a step by step guide on how to freeze our cream for a long time:
- Use Freshly Made Clotted Cream: Make sure you have fresh, high-quality clotted cream. A great way to do this is to use any leftover clotted cream from the fresh batch we just made. If freezing from store bought, check your unopened clotted cream for the expiration date and ensure that it hasn’t been open for too long.
- Portion Your Cream in Smaller Amounts: Divide the clotted cream into smaller portions. Think of smaller amounts that you’re likely to use in a single serving. Use airtight containers or silicone ice cube trays to freeze small batches. This helps to avoid later defrosting more than you need for any occasion.
- Freeze in Airtight Containers: Using a freezer-safe container spoon the clotted cream into the desired portions. It's a good idea to leave a small amount of space at the top as the cream may expand during freezing. Seal the air-tight container tightly to prevent air from getting in. Doing so will help prevent freezer burn and the formation of ice crystals. You can wrap with cling film or plastic wrap before placing in a freezer bag for extra protection.
- Label and Date: Don't forget to label your bag or container with the date. This will help to keep track of freshness. It’s always a good idea to label each sealed container or tray with the date of freezing or storage date to ensure you use it within its optimal timeline.
- Freeze for Up to 2 Months: Clotted cream freezes best for up to 2 months. It's also important to note that, as with freezing any dairy products, the freezing process may have a slight effect on its taste and texture. If there are slight texture changes, it's better to use this thickened cream in a recipe versus spreading on warm scones. Finally, when defrosting clotted cream, it’s best to transfer the portioned amount to the refrigerator and allow it to thaw slowly overnight. Use the thawed clotted cream as planned.

All the Ways to Enjoy this Homemade Clotted Cream
Now that we've taken the time to make this delectable treat, let's enjoy it! Some of my favorite ways to enjoy this clotted cream include:
- Slathered on warm scones or freshly baked quick bread with a dollop of homemade jam as part of a classic cream tea. This fig jam or blueberry butter have been top contenders lately.
- Spread onto a muffin in lieu of unsalted butter. Next, I add a little flaked salt. I do this before layering fruit spread.
- Add a dollop to a freshly baked galette like this galette with peach and thyme as a substitute for ice cream.
- PS: don't forget about the leftover liquid! You can most definitely use it in place of milk for a scone or biscuit recipe or even use it for a delicious pancake or waffle batter.
Final Thoughts
Ready to make your own homemade clotted cream? Print the how-to guide below and get started on making your own delectable treat today! If you make it, please let me know how it goes! Or if you have questions, please do not hesitate to ask me in the comments of this post. I am happy to help you in your own clotted cream journey! You can share in the comments below or on social media! Tag me on Instagram or on my Facebook page.
I hope this recipe for homemade clotted cream plus tips on how to freeze it was helpful. Hopefully it demystifies the process to making this quintessential condiment in British cuisine that can be enjoyed for any special occasion. Or, just relish it for the everyday!
Cheers to the next nourishing meal. 🧡

Recipe for Homemade Clotted Cream Plus How to Freeze
Equipment
- 1 shallow baking dish, measuring 10.5' by 7.5'
Materials
- 3 cups heavy cream
Instructions
Day 1: Baking the Cream
- Preheat your oven to 170-180F.
- Pour the heavy cream into a shallow casserole dish or baking dish. The heavy cream should come up along the sides about 1-2 inches. We want to ensure there is a lot of surface area during the slow bake.
- Bake the heavy cream in the oven for 12 hours, uncovered. You can start this process overnight and set your timer to check 12 hours from the start of the bake.
Day 2: Allowing Clotted Cream to Set
- After baking for 12 hours the cream will have developed a layer of skin indicating the fat has separated from the liquid. Use oven mitts to carefully remove the dish from the oven.
- Allow the baked cream to cool to room temperature. Once cooled, cover the dish and refrigerate overnight.
Day 3: Mixing the Clotted Cream & Storing
- Once chilled, remove the baking dish from the refrigerator and gently skim the thick layer of clotted cream from the surface. Place the skimmed cream into a medium mixing bowl. Leave the thinned liquid in the baking dish (you can save this for another use).
- Using a spoon, begin to stir the skimmed clotted cream, slowly at first, and then more vigorously to create a smooth and creamy texture. If the clotted cream is too thick for your preference, add in tablespoon at a time of the thinned liquid back into the cream. Continue to stir until it reaches your desired consistency.
- Store the clotted cream in an airtight container in the refrigerator for up to a week. You can also freeze small portions of the clotted cream for up to two months. Thaw desired portions in the refrigerator overnight before using.
Notes
- On the leftover milk: use the separated liquid like you would buttermilk. This can work beautifully in buttermilk scones or biscuits or even pancakes.
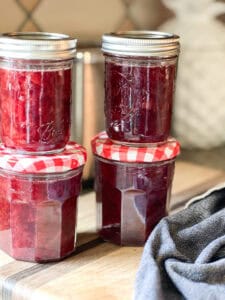
- For freezing: Make sure to use freezer-safe containers or freezer-safe glass jars with tight fitting lids to ensure the texture of the clotted cream is not compromised. Best to use the frozen clotted cream within two months as the texture can change.
- Storing clotted cream: Clotted cream will keep well in the refrigerator for up to a week. Check for any sour smells or mold spores which indicate the cream has gone bad.


Leave a Reply