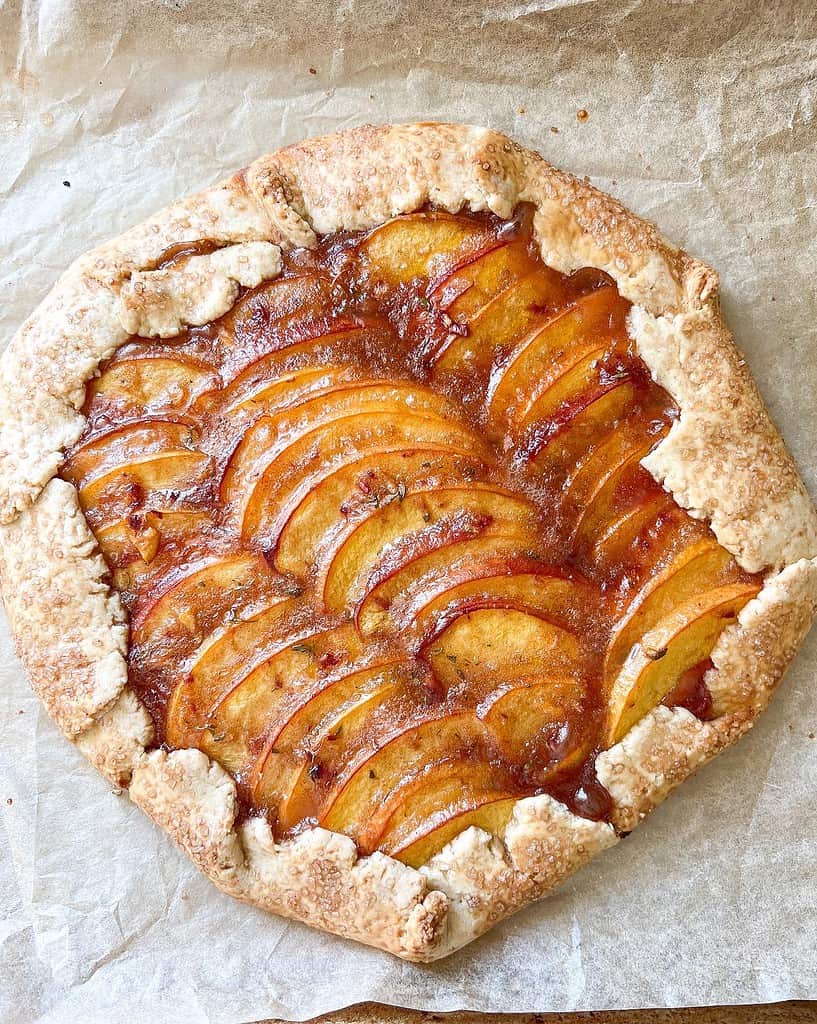
Summer stone fruits are in full swing and this is the best rustic sweet Peach and Thyme Galette to make for easy desserts! I make this each year and it's such a crowd pleaser. Fresh thyme and sweet peaches are tossed in brown butter and sugar for a delightful fruit galette that is easy to put together.
Scroll down to read more about how we make this wonderful dessert and get the card for this easy galette recipe.
Galette versus Pie: What's the Difference?
While pies and galettes share a similar dough type, pies are usually baked in a sloped sided dish. Galettes are a more rustic type of pie. The galette crust is rolled into a circle, the filling is place in the center, and the edges of the crust are gently folded over to contain the filling. The result is a rustic free-form pie that is a delicious dessert option for any gathering.

Ingredients for the Peach and Thyme Galette
For this Rustic Sweet Peach and Thyme Galette we'll need the following ingredients:
- Sweet Peaches: It wouldn't be a Peach Galette without them so get all the glorious summertime peaches you can find.
- Fresh Thyme: We're using fresh thyme in a simple syrup to brush on the galette and in the peach filling. The combination of these two ingredients is so good and I know you'll love it too.
- Brown Sugar: To sweeten our peach filling and offer a bit of caramelization we'll use brown sugar here.
- Cold Butter: We're using butter for the filling and as the base for our pastry dough. Cold butter is key to that buttery, flaky curst.
- All Purpose Flour: The butter and flour are the base for this traditional pastry crust.
Preparing the Peach and Thyme Galette
First, we'll need to prep our Thyme Simple Syrup. To do this, bring together ½ cup sugar, water, and thyme sprigs to a simmer until the sugar dissolves. Allow to cool slightly and let the thyme steep in the syrup.
Next, we'll prepare the flaky pastry dough. Prep your ice water in a small bowl with water and a few ice cubes. You'll need this to add to the flour mixture for the pie dough.
In the bowl of a food processor fitted with the slicing or dough blade, pulse the flour, sugar, and salt to combine. Add the cold butter chunks and pulse until the mixture looks like coarse meal with pea-sized pieces. Slowly add in 3 tablespoons of ice cold water and pulse until the pie dough just comes together. Form the dough into a ball and put it on a sheet of plastic wrap. Wrap the dough disc and chill in the refrigerator for at least one hour or up to two days before using rolling it out.
While the dough forms and chills in the fridge, prepare the peach filling. In a saucepan, melt butter over medium-low heat. Once the butter is melted and slightly browned, add the brown sugar and vanilla extract. Slice peaches thinly and place them in a large bowl. Add in the salt, chopped fresh thyme leaves, cinnamon, and the brown butter mixture. Toss the seasonal fruit to combine with the mixture.
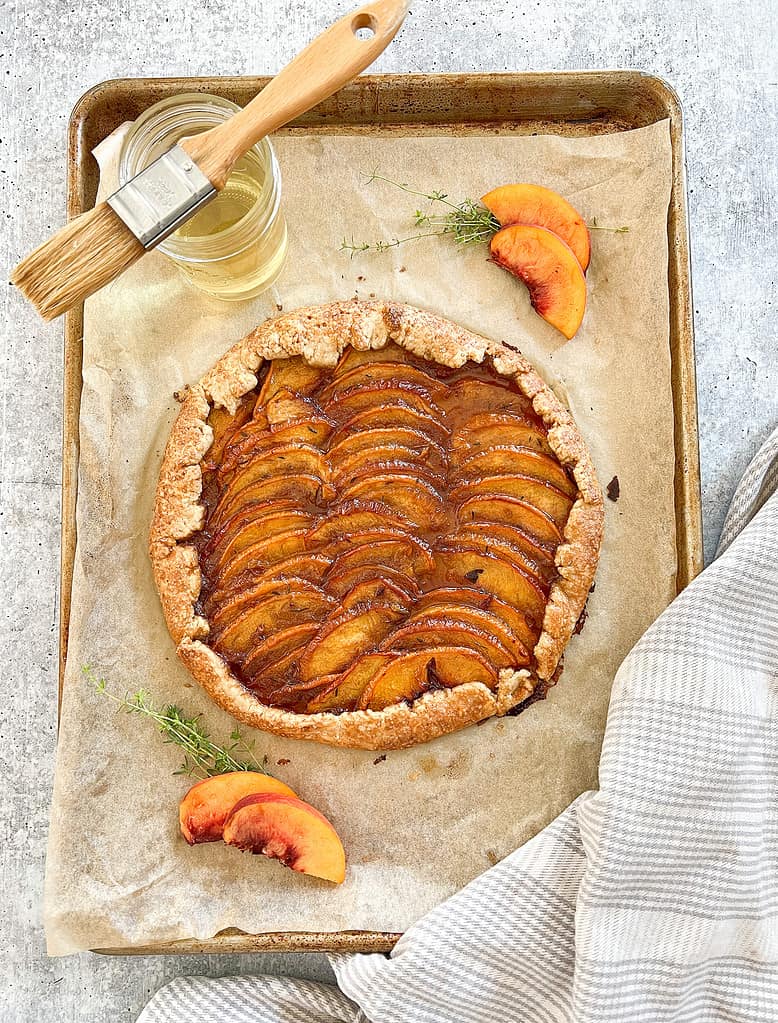
When ready to roll out the dough, take a rolling pin and roll out the edges of the crust to form a slightly perfect circle. It's okay if it is not a full circle, which is what gives the rustic dessert vibe. Place the flaky crust on a rimmed baking sheet lined with parchment paper. Arrange peach filling in the center of the dough and fold the edges of the crust to help create a border for the filling.

Baking the Peach and Thyme Galette
While preparing the galette in the steps above, preheat the oven to 375 degrees Fahrenheit. After arranging the galette onto the prepared baking sheet:
- In a small bowl, whisk your egg with a splash of water to create an egg wash. Brush the folded edges of the galette crust with the egg wash. Sprinkle a few pinches of turbinado sugar evenly over the dough.
- Place galette in oven and bake, rotating halfway through, until the crust is deep golden brown everywhere, the peaches are softened, and juices are bubbling, about 45–50 minutes.
- Remove from oven and cool for 5 minutes before brushing the top of the galette with the thyme simple syrup, focusing on the exposed peaches (no need to brush the crust edges).
- Allow the galette to cool at least 20 minutes before serving. Serve alongside whipped cream or your favorite scoop of ice cream.
More Delightful Desserts
Sweet tooths are satisfied year round here and these desserts are great ones to keep on hand for all types of seasonal fruit:
- This Cherry Compote is fantastic to use fresh sweet cherries and can be used as a filling for another fruit galette.
- A cherry and berry crisp that can be made in the cast-iron skillet is always delicious with a scoop of vanilla ice cream.
- Guava and Cream Cheese Pastries are a sweet weekend project using your favorite puff pastry.
Tag me on social media if you make it so I can see your creations and let me know in the comments section what you think. This galette is the perfect way to celebrate the summer seasonal fruits. Other variations include a fresh berry or fresh cherry galette. This dessert is a winner.

The Best Rustic Sweet Peach and Thyme Galette
Ingredients
Thyme Simple Syrup
- ½ cup granulated sugar
- ½ cup water
- 8 sprigs of fresh thyme
Galette Crust
- 180 grams unbleached all-purpose flour
- 2 tablespoon brown sugar
- ½ teaspoon kosher salt
- 1 stick butter (8 tbsp cut into ½ inch diced pieces
- 4 tablespoon ice water
Peach Filling
- 2 large peaches pit removed and thinly sliced
- 2 tablespoons unsalted butter
- 3 tablespoons brown sugar packed
- 1 teaspoon vanilla extract
- 3 sprigs thyme + ½ teaspoon roughly chopped thyme leaves
- ½ teaspoon ground cinnamon
- ½ teaspoon kosher salt
- Thyme simple syrup for brushing
Instructions
Thyme Simple Syrup
- In a saucepan, combine granulated sugar, water, and thyme sprigs. Bring mixture to a boil over medium-high heat, stirring constantly until sugar dissolves. Remove from heat and cool to room temperature. Remove and discard thyme sprigs. Set aside and prepare the galette crust.
Galette Crust
- In a food processor, pulse the flour, sugar, and salt to combine.
- Add the butter pieces and pulse until the mixture looks like coarse meal with some pea-size pieces.
- Slowly add in 3 tablespoons of ice water and pulse until the dough comes together. If too dry, add the remaining water by the teaspoon and pulse until the dough just comes together.
- Form the dough into a ball, put it on a sheet of plastic wrap and then press it into an 8-inch round. Wrap it tightly in the plastic wrap and refrigerate for at least 1 hour or up to 2 days before rolling out. (Note: you can also freeze the dough for up to 2 months; make sure to thaw in the refrigerator overnight before rolling it out.)
Prepare Peach Filling
- In a saucepan, heat 2 tablespoons butter over medium-low heat. Turn the heat onto medium and begin stirring to move the butter around as it starts to melt. Once melted, the butter will begin to foam and sizzle around the edges. Keep stirring to prevent butter from burning. In about 5-8 minutes from when you started, the butter will turn golden brown. The foam will slightly subside and the milk solids on the bottom of the pan will toast and become golden. It will smell intensely buttery, nutty, and rich: the desired outcome. Remove from heat once you smell the butter, nutty scent.
- Add your brown sugar and vanilla extract to the browned butter. Stir until well combined and sugar has dissolved. Cool slightly as you work on the filling.
- Slice your peaches thin, about ¼ inch slices. Place sliced peaches in a large bowl and add in salt, chopped fresh thyme leaves and cinnamon. Stir gently to combine. Pour in your brown butter mixture and stir to combine with the peaches so the peaches are coated in the brown butter mixture.
Assemble & Bake Galette
- Preheat oven to 375 degrees fahrenheit. Place your chilled dough onto a lightly floured surface and begin rolling out to about ¼ inch thick. Place the rolled out dough onto a piece of parchment paper on a rimmed baking sheet.
- Arrange the fruit mixture in the center of the chilled dough, layering the sliced peaches in a desired design, and spread out evenly, leaving a 2 to 3-inch border around the galette.
- Fold edges of dough up and over fruit, pleating as needed and being careful that the folded edges of the dough do not tear (if it does, patch with dough scraps and pinch to seal).
- In a small bowl, whisk your egg with a splash of water to create an egg wash. Brush the folded edges of the galette crust with the egg wash. Sprinkle a few pinches of turbinado sugar evenly over the dough.
- Place galette in oven and bake, rotating halfway through, until the crust is deep golden brown everywhere, the peaches are softened, and juices are bubbling, about 45–50 minutes.
- Remove from oven and cool for 5 minutes before brushing the top of the galette with the thyme simple syrup, focusing on the exposed peaches (no need to brush the crust edges).
- Allow the galette to cool at least 20 minutes before serving. Serve alongside whipped cream or ice cream.


Leave a Reply